Multi-parametric 3D animations
Overview
Use commands: ANIMATIONEDITOROPEN and ANIMATIONEDITORCLOSE.
You can animate several parameters and program camera movements with the Animation Editor panel. Once the animation is programmed, you can play it in BricsCAD or render it as a 2D video.
Each parameter animation has its own "timeline". You can add as many animation sequences to a parameter as you like, as long as these sequences do not overlap.
There is also a special timeline for camera movements. You can add as many camera sequences as you like. You can set both the point of focus and the position of the camera with either a polyline or a point. This is similar to the ANIPATH command.
Scenes, Timelines, and Animation Sequences
Scenes
A scene consists of one or more timelines and each of these timelines has one or more animation sequences. When the editor is launched for the first time it automatically creates a scene. A scene sets the duration of the animation. Together, they define the animation schedule used for playback and render. Currently, you can only render the current scene with the Animation Editor. However, you can have many scenes in the same document and you can switch between them.
Animation sequences
- ParameterAn animation sequence represents the continuous change of a parameter from a start to an end value. For example, a distance constraint between two faces: the animation will move one face to a maximum and minimum distance value.
- CameraAn animation sequence corresponds to a continuous camera movement on a path. You can adjust various camera movements with the camera timeline.
Timelines
A timeline is a visual representation of an animation sequence for an object. The timeline displays how and when the parameters will animate. Each parameter has its own timeline in a scene. Animation sequences cannot overlap. A timeline can be temporarily disabled to exclude it from an animation. All timelines are independent. This means that you can animate many parameters at the same time and see their combined effects.
To open the Animation Editor
- Place the cursor on a toolbar, right-click, and choose Animation Editor from the context menu.
- Click the Animation Editor tool (
 ) on the
View section of the ribbon.
) on the
View section of the ribbon. - Choose Animation Editor from the View menu.
- Enter ANIMATIONEDITOROPEN into the Command line.
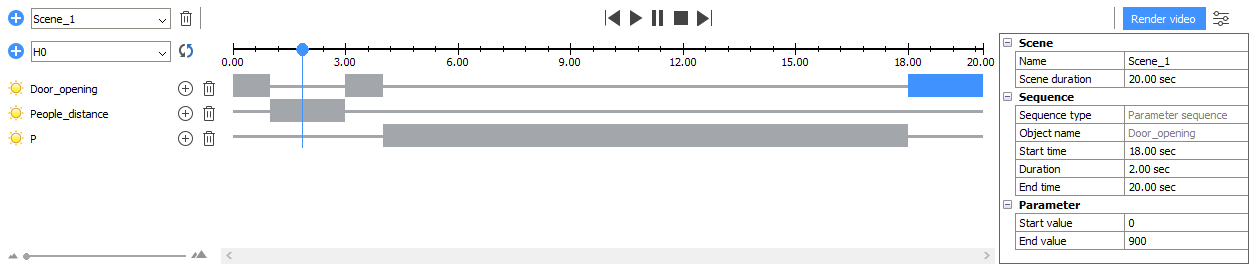
The Animation Editor Interface
- Toolbar: Contains tools to select a scene, adjust an animation and render a video.
- Timelines area: Add and edit the timelines and animation sequences.
- Configurator: Configure the parameters of the current scene and the selected animation sequence.
Toolbar

- Add and remove scenes.
- Control the playback of the animation.
- Set the duration of the current scene.
- Add a camera timeline.
- Start a render.
| Tool | Name | Description |
|---|---|---|
 |
Add Scene | Add an empty scene with a default duration. |
 |
Scene Selector | Select the current scene. |
 |
Remove Scene | Remove the current scene from the document. |
 |
To previous sequence | Jump to the start of the previous animation sequence. |
 |
Play | Start the animation. |
 |
Pause | Pause the animation. |
 |
Stop | Stop the animation and return the cursor to the start position. |
 |
To next sequence | Jump to the start of the next animation sequence. |
 |
Render video | Open a dialog box to start the render of a 2D video. |
 |
Toggle configurator | Toggle the configurator panel. |
Timelines Area
Use the Timelines Area to add and remove timelines, to add and remove animation sequences, and to display the animation schedule. Click on an animation sequence to select it, or drag the start or end of the bar to adjust the duration. The selected animation sequence displays in blue, other sequences display in gray. Each timeline in the timelines area can be temporarily disabled to exclude it from the animation.
The Timelines Area has a cursor that represents the current position in the animation. When the animation is played, the cursor represents the current playback position. You can also manually move the cursor to a new position at any time. When the cursor is moved, all parameters change to match the current frame. The camera position is also updated.
To make sure that the model state corresponds to the current animation position,
click  .
.
Time Scale
| Tool | Name | Description |
|---|---|---|
|
Add Timeline | Add the selected parameter to the timeline. |
 |
Object Selector | Select the object to add to the timeline. |
|
Update model | Update the model state with respect to the current cursor position. |
 |
Time Scale | Display the time marks along the timeline. |
|
Cursor | Display the current position of the playback. |
Timeline
| Tool | Name | Description |
|---|---|---|
 |
Timeline Enabled | Indicates that the timeline is enabled. Click to disable the timeline. |
 |
Timeline Disabled | Indicates that the timeline is disabled. Click to enable the timeline. |
|
Timeline Object | Displays the name of the associated object. |
 |
Add Sequence | Add a new animation sequence, at the cursor position. |
|
Remove Timeline | Remove a timeline from the animation. |
 |
Animation Sequence | Represents the duration and position of an animation sequence. Left-click to select the sequence. |
 |
Selected Animation Sequence | Represents the duration and position of the selected
animation sequence. You can see and change the properties in the
Configurator. Move the mouse to the end of the sequence, until the cursor changes to a double-sided arrow. Then left-click and drag to change the start time, end time and duration. Left-click at the middle of the sequence and drag to a new position at the timeline, without changing the duration. |
Configurator
Access all the properties of the animation scene and the selected sequence via the Configurator. All properties are grouped by object.
- Scene: Properties of the current scene.
- Name: Name of the scene.
- Duration: Duration of the scene, in seconds.
- Sequence: Properties of the selected sequence.
- Sequence type (read only): The type of the sequence.
- Object name (read only): The name of the object controlled by that sequence.
- Start time: Start time of the sequence, in seconds. The duration will be adjusted, the end time will remain unchanged.
- Duration: Duration of the sequence, in seconds. When changed, the end time will be adjusted with respect to the start time and duration.
- End time: End time of the sequence, in seconds. When changed, the duration will be adjusted, the start time will remain unchanged
- Parameter (for parametric sequences)
- Start value: Start value of the parameter.
- End value: End value of the parameter.
- Camera (for camera sequence)
- Camera path type: Camera path entity type.
May take one of the following values:
- Point: The camera is fixed in the given point.
- Path: The camera moves along the given path.
- Camera point (when the Camera path
type is set to Point). The
following controls are displayed:
Table 4. Camera point 
List of previously used points. Select the point from the drop-down list to use one. 
Click to select the point in the model. After the point is selected, a dialog box is displayed: Figure 7. Path Name 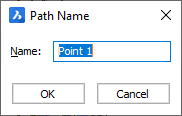
- Name: Enter the point name.
- OK: Click to accept the point selection.
- Cancel: Click to cancel the point selection.

Click to remove the point from the list. - Camera path (when the Camera path
type is set to Path). The
following controls are displayed:
Table 5. Camera path 
List of previously used paths. Select the point from the drop-down list to use one. Click to select the path in the model. After the path is selected, a dialog box is displayed: Figure 8. Path Name 
- Name: Enter the path name.
- OK: Click to accept the point selection.
- Cancel: Click to cancel the point selection.
Click to remove the path from the list. - Target path type: Type of the target path.
Target defines the point the camera will look at the given moment.
Can take one of the following values:
- Point: The target is fixed to a given point.
- Path: The target moves along a given path.
- Target point (when the Target path
type is set to Point). The
following controls are displayed:
Table 6. Target point List of previously used points. Select the point from the drop-down list to use one. Click to select the point in the model. After the point is selected, a dialog box is displayed: Figure 9. Path Name 
- Name: Enter the point name.
- OK: Click to accept the point selection.
- Cancel: Click to cancel the point selection.
Click to remove the point from the list. - Target path (when the Target path
type is set to Path). The
following controls are displayed:
Table 7. Target path List of previously used paths. Select the point from the drop-down list to use one. Click to select the path in the model. After the path is selected, a dialog box is displayed: Figure 10. Path Name 
- Name: Enter the path name.
- OK: Click to accept the point selection.
- Cancel: Click to cancel the point selection.
Click to remove the path from the list.
- Camera path type: Camera path entity type.
May take one of the following values:
Animation Playback
Use the animation playback controls to preview an animation.
- To start an animation, click the Play button.
The playback starts from the cursor position.
- To pause the animation, click the Pause button.
- To stop the animation and move the cursor to the start of the animation, click the Stop button.
You can jump to the next or the previous animation sequence (in chronological order) with the Jump to Next Sequence and Jump to Previous Sequence tools respectively.
- During playback, the parameters involved in the scene and the camera position are changed directly in the drawing. For complex models, the recalculation of the model may take a significant amount of time. You can use the cursor to check the key moments of the animation instead.
- During playback, the camera will move with any set camera sequences. If no camera sequences are present, the current view is used. The output video is the same as the current viewport.
- After the playback finishes, the model will automatically revert to the
state before the animation was started. In some cases, it may cause the
model to be in a different state than the cursor position would dictate.
To update the model with respect to the current cursor position, click
.
Render
- Click the Render video button to render the animation
as a 2D video.The Render video dialog box displays:
Figure 11. Render video
- Adjust the render parameters:
- Render frame rate (fps): The frame rate.
- Resolution: The resolution of the video.
- File format: The format of the video (AVI, MPG and WMV formats are supported).
- Start time: The time position the render will start.
- End time: The time position the render will end.
- Click the Render button to start the render.A file dialog box displays:
Figure 12. Save Video As
- Specify the location and the name of the output file.
- Click Save to start the render.A preview shows the progress.
To add a new scene
- Click the Add Scene button.The Add scene dialog box displays:
Figure 13. Add scene
- Enter the scene name.
- Enter the scene duration in seconds.
- Click Add to add the scene.
To remove a scene
- Select the scene with the Scene Selector.
- Use the Remove Scene tool.
To add an animation of a parameter
- Add the desired parameter to the timeline:
- Select the parameter with the Parameter Selector.
- Use the Add Timeline tool to add a new timeline.
- Place the cursor at the desired start position on the Time Scale.
- Use the Add Sequence tool to add a new animation
sequence,or double-click at the timeline where you want to add a new sequence.
- Drag to adjust the desired duration of the sequence,or use the Configurator to set the desired start time, end time or duration, in seconds.
- Use the Configurator to set the desired start and end values for the parameter.
To add a camera movement
- If applicable, add a camera timeline by selecting Camera from the Object selector.
- Place the cursor at the desired start position on the Time Scale.
- Use the Add Sequence tool on the camera timeline to
add a new camera sequence,or double-click at the timeline where you want to add a new camera sequence.
- Click and drag to adjust the desired duration of the sequence,or use the Configurator to set the desired start time, end time or duration, in seconds.
- Use the Configurator to set the camera path:
- Choose the Camera path type from the
following:
- To specify that the camera position should be fixed, or
- Path to specify that the camera should move along the given path.
- Use the Camera point property to select the point or the Camera path to select the path.
- Select the property for editing, then click to select the path or
the point on the model,or select one of the previous points or paths from the drop-down list.
- Choose the Camera path type from the
following:
- Use the Configurator to set the target path. The
target is the point where the camera will focus
on.To choose the Target path type do one of the following:
- Specify that the target should be fixed.
- Path to specify that the target should move along the given path.
Use the Target point property to select the point or the Target path to select the path:Select the property for editing, then click to select the path or
the point on the model,or select one of the previous points or paths from the drop-down list.
To remove an animation sequence
- Right-click the sequence.
- Select Delete from the context menu.
As an alternative you can:
- Left-click the sequence.
- Hit the Delete key.
To disable or enable a timeline
- Check the timeline status icon. If the icon is , then the
timeline is disabled. If the icon is , the
timeline is enabled.
- Click the timeline status icon to toggle the status.
Animation sequences on disabled timelines are not included in the animation.
To animate an exploded view
As the animation editor is not supported in Block editor or reference editing modes, only exploded views inserted in the model space can be animated.
- Insert the exploded view in model space.
- If applicable, suppress the exploded view and the model, if you want to hide or show them during animation.
- Select the exploded view object in the Object selector.
- Click to add a
timeline.
- Use the Add Sequence tool on the exploded view
timeline to add a new exploded view sequence,or double-click at the timeline where you want to add a new sequence.
- Click and drag to adjust the desired duration of the sequence,or use the Configurator to set the desired start time, end time or duration, in seconds.
- If applicable, use the Configurator to set the start step and the end step of the exploded view, or to enable the autohide option.
To render a video
See the section Render.