Schedules
Open the BIM project browser panel
- Move the cursor over a toolbar, ribbon item or a dockable panel.
- Right-click.
- Choose in the context menu.
See the article Project browser, for more information about the BIM Project Browser.
How to create schedules
Schedules are exports, entity properties, block attributes and drawing information to tables on sheets and tables.
Step 1: create a project
For more information about creating a project, see the article Project browser.
When the project is created, right-click in the Schedules section. Click Add Schedule (Wizard)... to open the wizard.
Step 2: the schedule wizard
A wizard of 3 pages displays, this will help you to create a schedule.
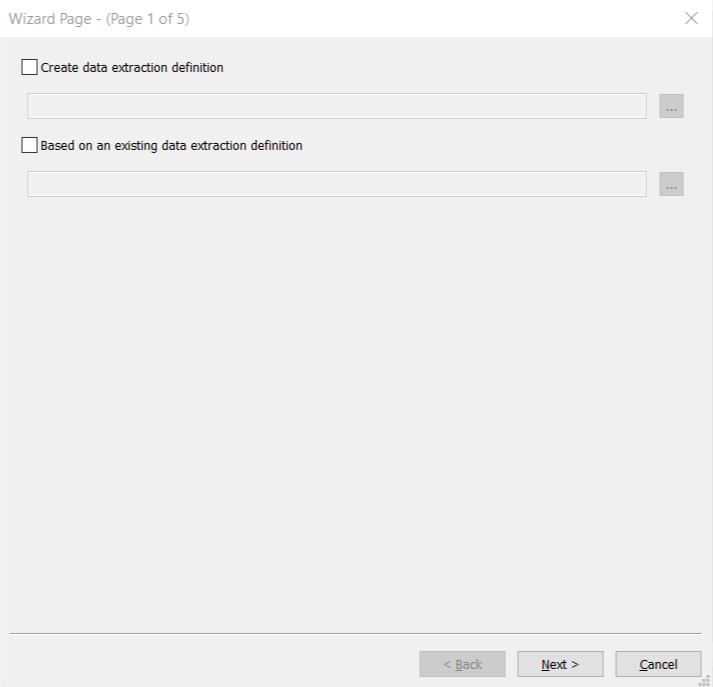
- Page 1
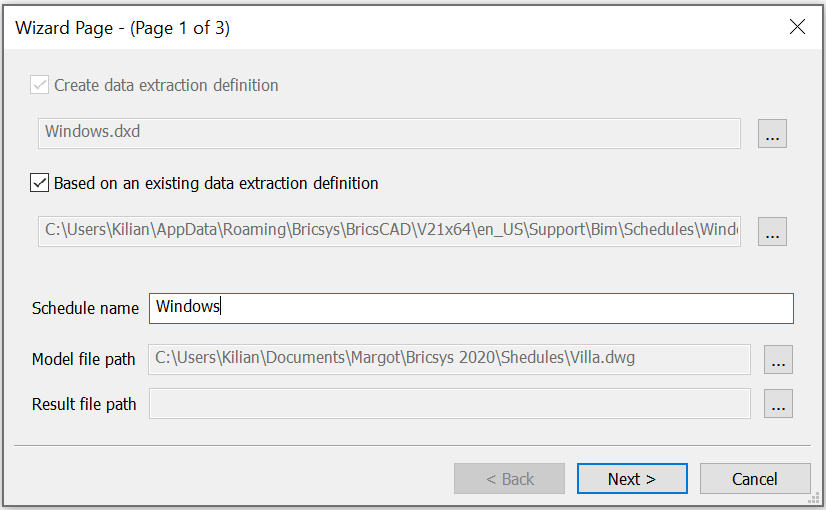
(1) Create data extraction definition creates a new .dxd (data extraction definition) file:- Turn the option on.
- Click the Browse button (
 ).
). - In the file dialog box, select a folder.
- Enter a name in the File name field.
- Click the Select Folder button.
Note: By default, the .dxd file will be placed in the project folder. To change this path click the Browse button.(2) Based on an existing data extraction definition uses an existing .dxd file as the template for the new one:- Turn the option on.
- Click the Browse button ().Note: The .dxd files are stored in ..\bim\schedules serve as templates.
- In the file dialog box, select a .dxd file.
- Click the Open button.Note: By default .dxd files are saved in the ...\Bim\Schedules subfolder of the Support folder. You can use newly created custom .dxd files too. Also, you can create a .dxd files by yourself using a text editor. Please scroll down for the procedure. "How to create and edit your own Data Extraction file" in this article.
You can either choose a new name for your schedule or keep the default name.
(3) Model file path: The model path links to the model. This is filled in automatically if the wizard is started in the model file. If the wizard is started in another file from the project, link the model file:- Click the Browse button ().
- In the file dialog box, select the model file.
- Click the Open button.
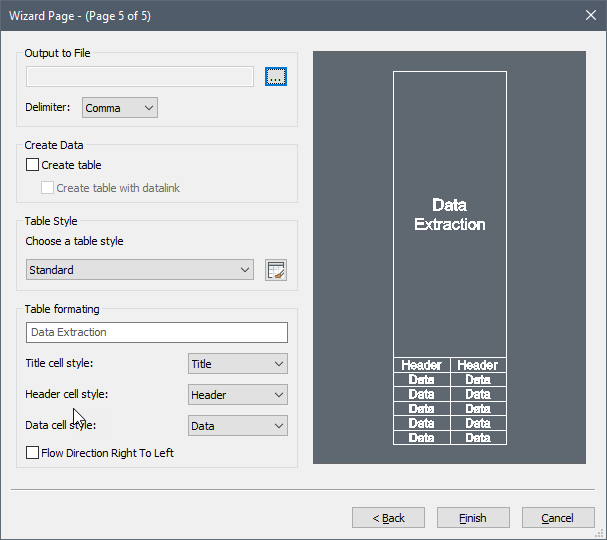
(4) Result file path: The Result file path determines where the schedule is created. When left blank, the Schedule is created as a new sheet:- In the file dialog box, select the sheet file.
- Click the Open button.
Click Next for the next page.
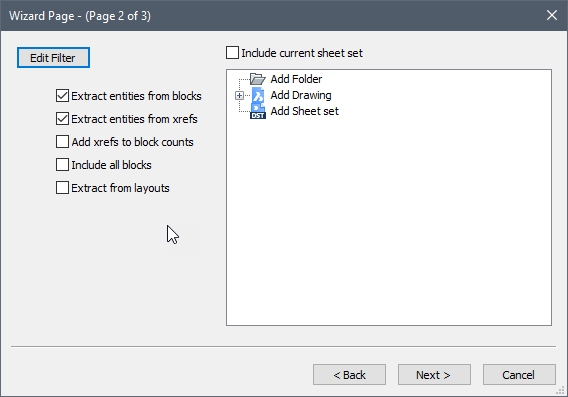
- Page 2
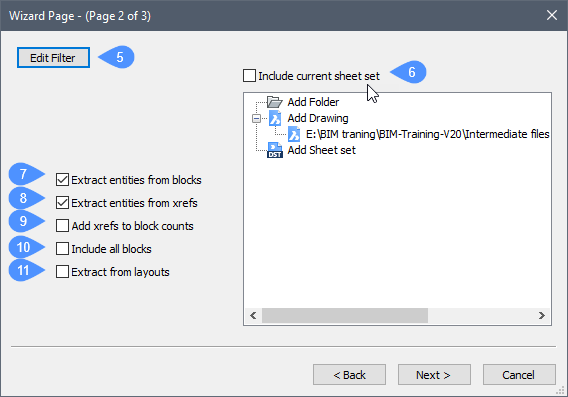
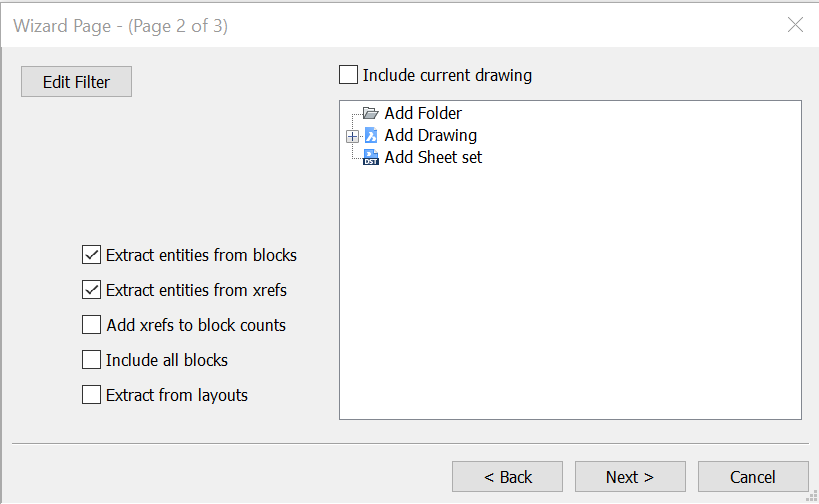
(5) Edit Filter: The filter selects which BIM entity types are included in the Schedule. Use an existing data extraction definition to automatically define the filter. See the Editing Data Extraction Definition (.dxd) files to learn more about the filter syntax.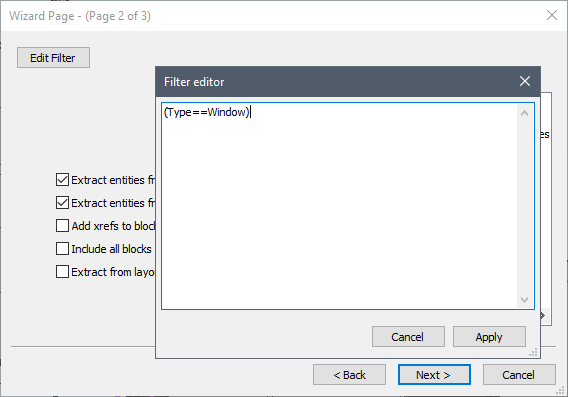
(6) Include current sheet set: Adds the current sheet set for data extraction.
(7) Extract entities from blocks: Adds entities in blocks which will also be processed in the schedule.
(8) Extract entities from xrefs: Adds all entities in xrefs which will also be processed in the schedule.
(9) Add xrefs to block counts: Counts selected xrefs as blocks.
(10) Include all blocks: Includes all blocks into the schedule.
(11) Extract from layouts: When toggled on, all entities layouts will also be processed in the schedule.
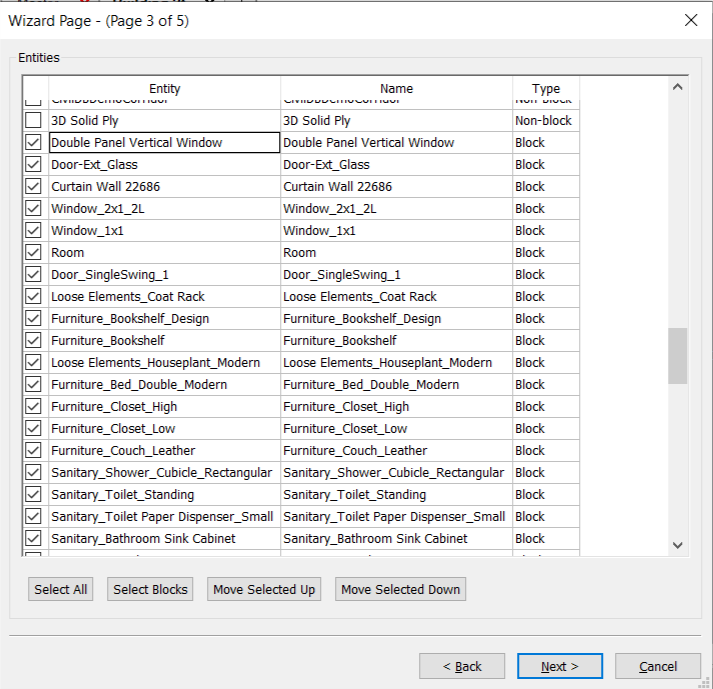
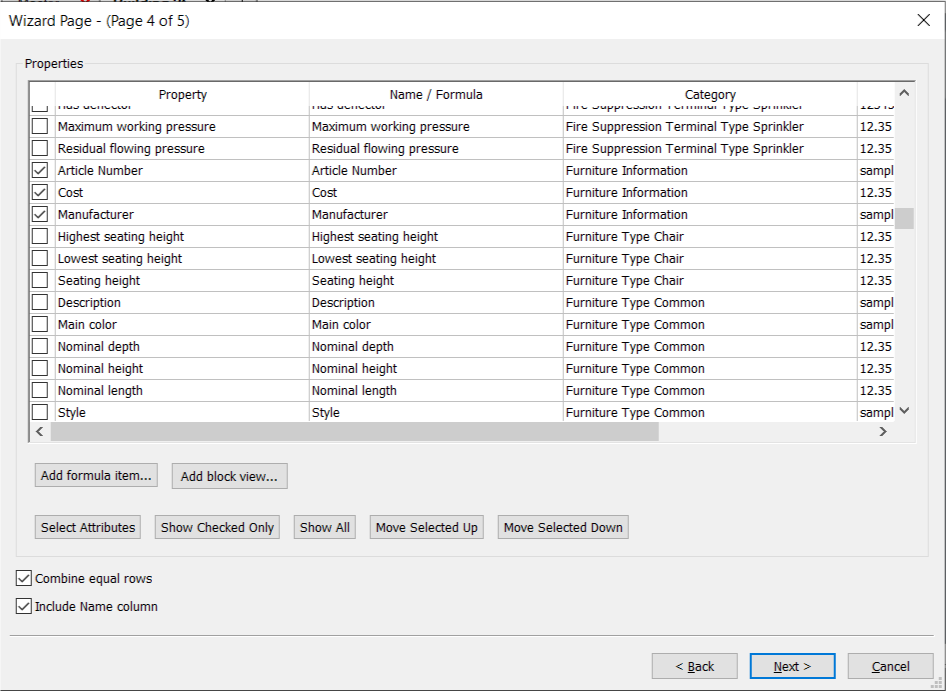
Note: The Wizard automatically selects all entities in the drawing. - Page 3
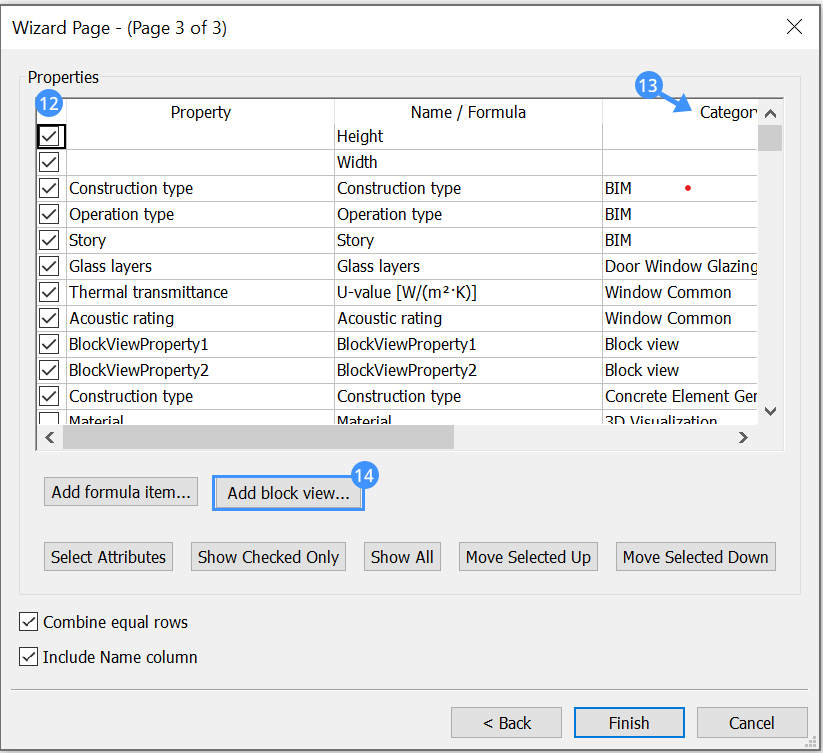
(12) Select the properties to be included in the schedule: click the checkbox to check/uncheck a property: selected (
 ) or
not selected (
) or
not selected ( ).
).(13) Click on the Category column to change how the property is shown in the schedule.
(14) To include plan and elevation symbols, click on the Add block view... button.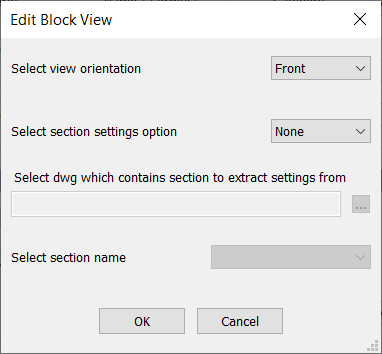
To sort the list, click the title in the column heading. Click again to sort in reverse order.
Click Finish to close the wizard (or click Back to switch back to page 2).
Update and display schedules
- Right-click on the new schedule (created in the BIM Project
Browser). A context menu appears:
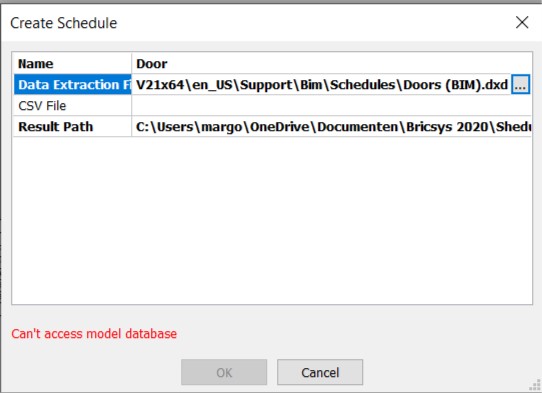
Schedule Properties... Name: Renames the schedule.
Model: Displays the link to the model file.
DWG Handle: Displays the DWG Handle.
Data Extraction File: Displays the link to the Data Extraction Definition.
CSV File: Displays the link to the .csv file.
Result Path: Displays the resulting path.
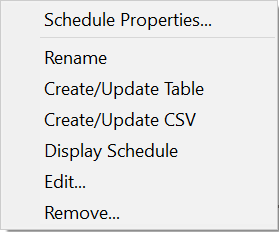
Rename Renames the schedule. Create/Update Table Creates a sheet with the schedule or updates the sheet. Create/update CSV Creates a CSV file with the schedule information and saves it in the folder where de model file is located or updates the CSV file if it already exists. Display Schedule Displays the schedule in the resulting drawing. (If not already open, the drawing is opened. Edit... Opens the Wizard Page dialog box where you can edit your schedule. More information about this setup can be found in the procedure in this article. Remove... Removes the schedule. - Click on Update.
- Once the schedule is updated, click on Display Schedule. The schedule is shown in the desired sheet. Or double-click on the schedule's name to display the schedule.
Procedure: create a window schedule
In this example, you will learn how to make a window schedule from scratch. You can create a door schedule in the same way.
Step 1: open schedule wizard
- Open the BIM Project Browser.
- Right-click on Schedules. A context menu appears.
- Click on Add Schedule (wizard)... to open the wizard.
Step 2: the schedule wizard
- Page 1
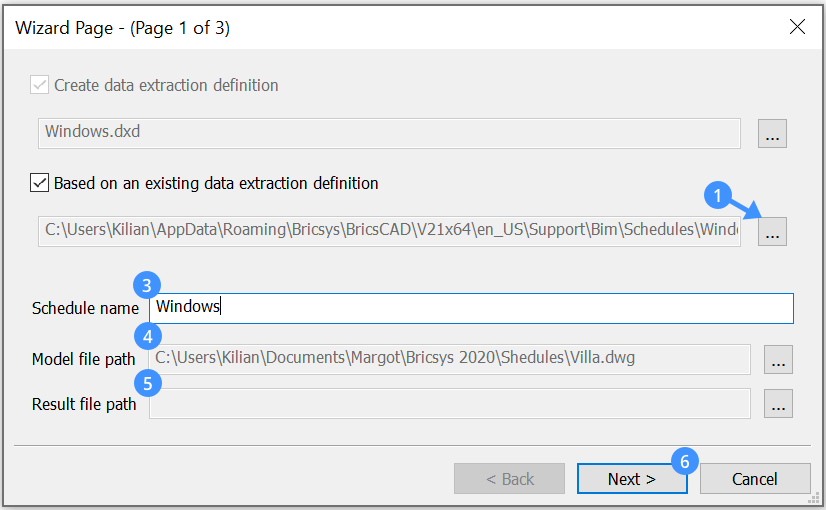
For this example, use an existing data extraction definition.- Click on the Browse (1) button. A folder pops up. This contains the predetermined data extraction definitions.
- In the folder, select 'Windows.dxd'.
- Change the Schedule name (3) to, in this case, Windows.
- The Model file path (4) is correct because it was taken from the model file. To create the schedule on a separate sheet keep the Result file path (5) empty.
- Click Next (6).
- Page 2
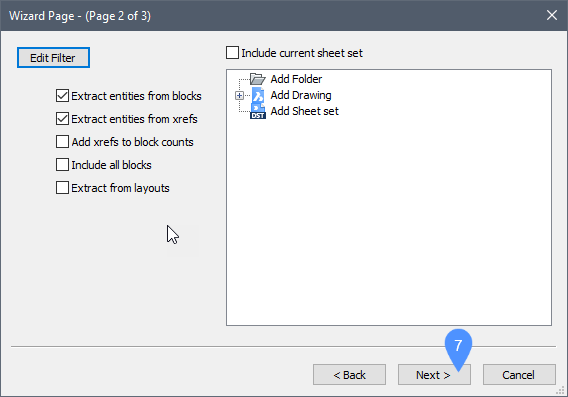
- The wizard automatically selects all the entities in the model.
- Click Next (7).
- Page 3
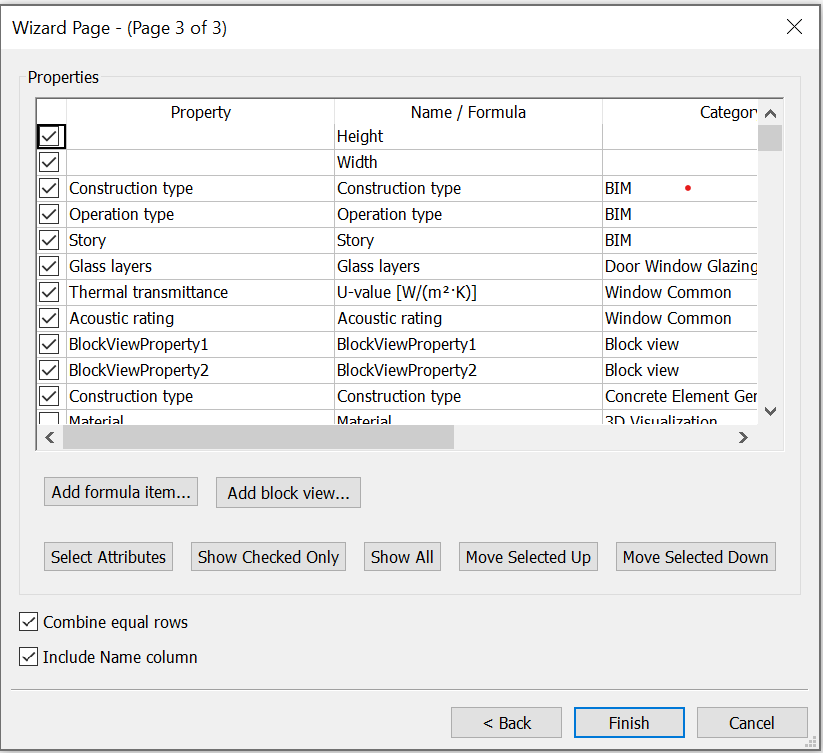
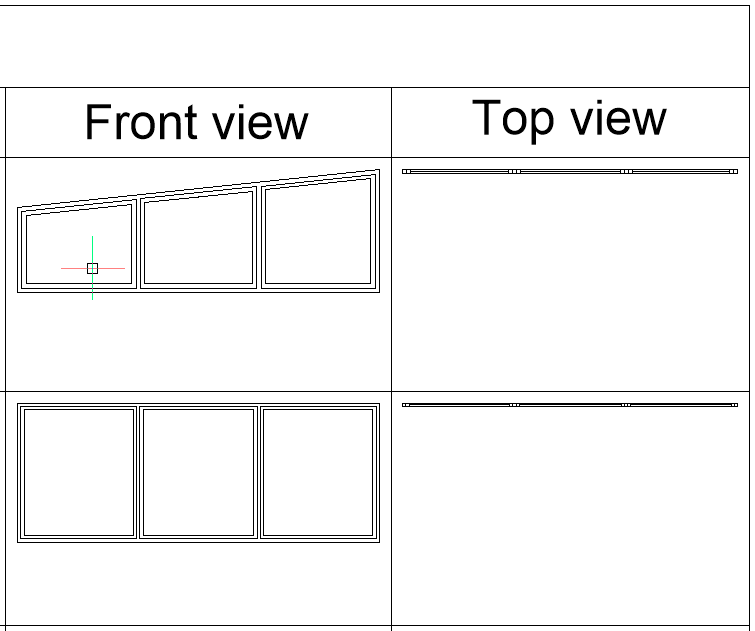
- Because you use an existing .dxd, the properties are already pre-selected. Views such as Front and Top are also pre-set.
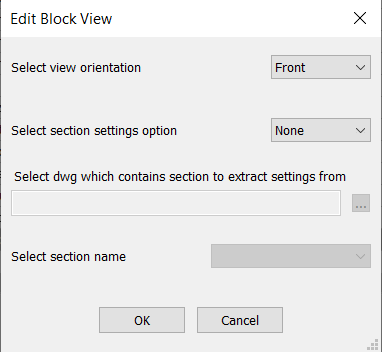
- Click on the Block view category, the Edit Block View window appears.
- Choose the view.
- Click Finish.
- Right-click on the new schedule.
- In the context menu select Create/Update Table.
- Double click on the schedule.
- Right-click on the schedule and select Display Schedule.
- Go to Sheets and double-click on the schedule sheet. Open the schedule.
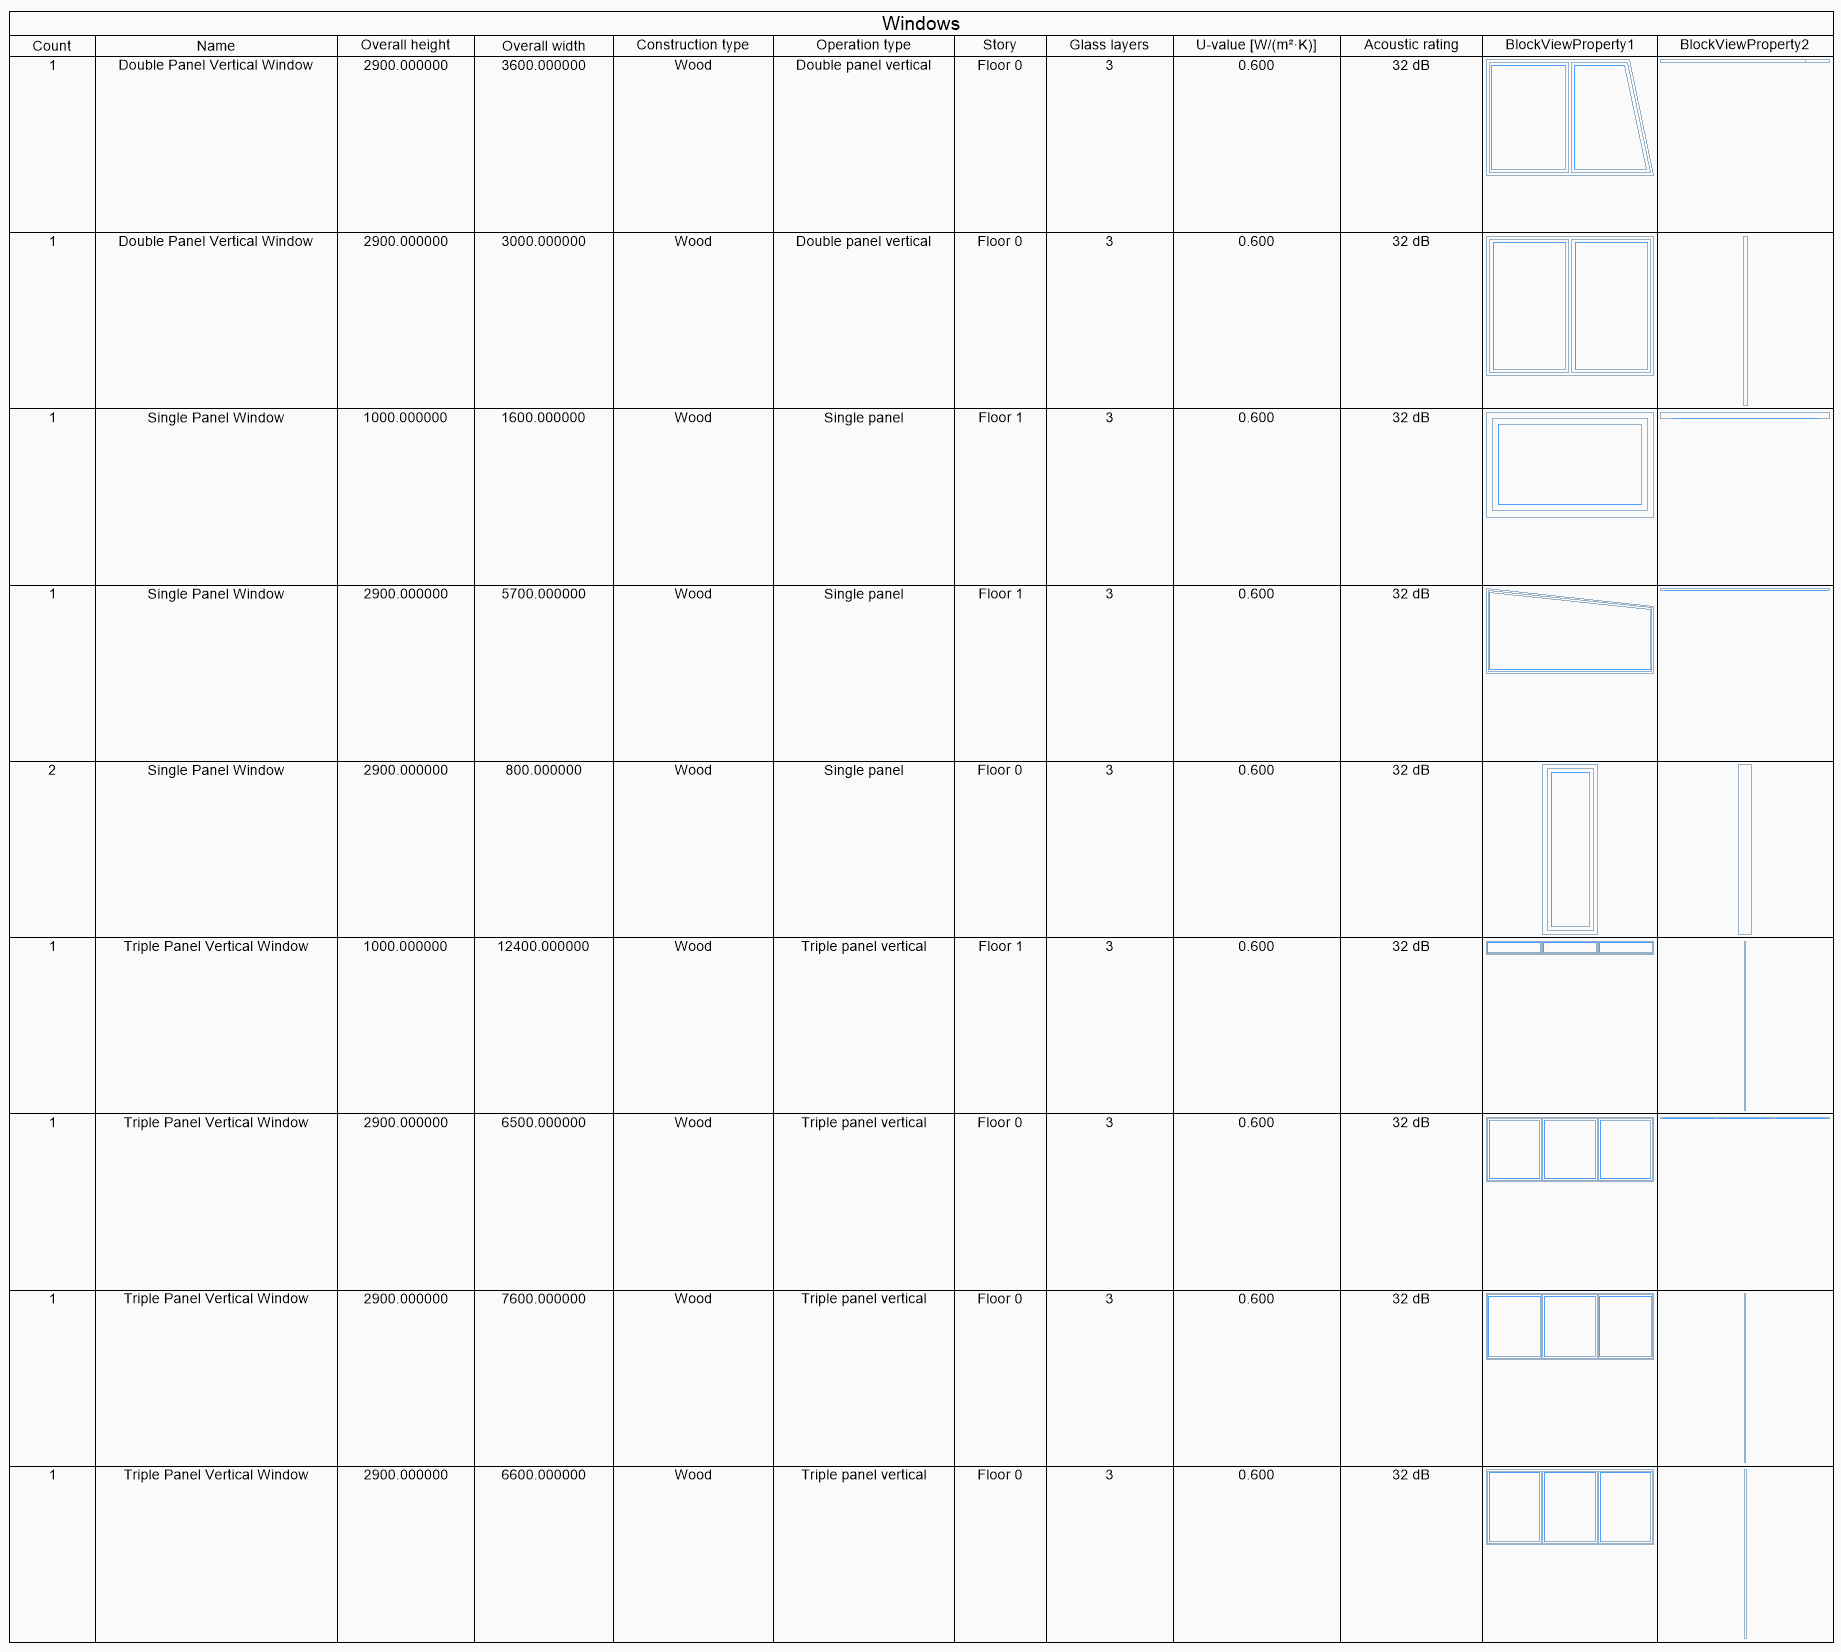
- The result is as follows:
Procedure: how to create and edit your own data extraction file: furnishing elements
You can also create a Data Extraction File by yourself and use it to make new schedules. The DATAEXTRACTION command will, just like the Schedules wizard, make a new .dxd file with your settings, but it will also make a .csv file with your data in it.
- Open your model file.
- In the Structure Browser, select all Furnishing Elements.
- Type in DATAEXTRACTION in the Command line. A wizard of 5 pages appears:
- Check the Create data extraction definition box and
choose a file. Name it “FurnishingElements.dxd” and save it in your project
folder.Note: You can base you dxd file on an existing Data Extraction Definition file by checking Based on an existing data extraction definition. And choose the file you want to base on.
- Click Next.
- Select all entities you want to include in your schedule.
- Click Next.
- Select all entities you want to have a data extraction of.
- Click Next.
- Check the all properties you want in the Furniture
Information.
- Click Next. The next page appears:
- Click on the three dots next to the Output to File. Give in a new name for your .csv file and click Save. You can choose between different options for the delimiter, but it’s best to use a semicolon.
- You can create a Data table as well. When checking this, you will have the option to place the table any where inside your drawing either model space or paper space.
- Click Finish.
- This should have created 2 files: a .csv file containing the results of the data extraction (basically the same as a schedule, but in an external file) and a .dxd file. This .dxd file can now be re-used for creating a schedule. (See procedures above).
- Open the .dxd file in a text editor. We can see 5 sections: Settings, Entity Types, Properties, TableFormatOptions and SELECTION SET.
- Leave the Settings as they are.
- The Entity Types are chosen because of the selection set you had active when using data extraction. However, instead of explicitly choosing which types (and handles, see later) you want to extract data from, you can replace the explicit entity types by an asterisk (*), to define that we want to extract information from all entity types.
- Leave the Properties as they are.
- Leave the TableFormatOptions as they are.
- You can delete the entire SELECTION SET section, if you don’t want to explicitly define which entities you’ll be extracting data from.
- You can add a filter by adding a new section: The section title is called [Filter] The section content is (Type == Furnishing Element) (in the .dxd files that are given as example in the support folder, a Filter on Door and Window type is used).
- Thus, the contents of the .dxd file should be as
follows:
[Settings]
ExtractFromBlocks=0
ExtractFromXrefs=1
CountXrefs=0
CombineEqualRows=1
IncludeNameColumn=1
FooterStyle=0
FlowDirectionRtoL=0
CVSdelimiter=1
IncludeLayouts=0
[Entity Types]
*
[Properties]
Furniture Information:Article Number|Article Number|
Furniture Information:Cost|Cost|%1u2%pr2
Furniture Information:Manufacturer|Manufacturer
[TableFormatOptions]
TableStyle=Standard
TitleCellStyle-TITLE
HeaderCellStyle-HEADER
DataCellStyle-DATA
[Filter]
(Type==Furnishing Element)
- Save this .dxd file in your project folder.
Procedure: how to edit a schedule
- Go to the Schedules tab in the Project Browser.
- Right-click the selected schedule. A context menu appears:
- Click Edit… A Wizard of 2 pages appears:
- Check or uncheck the options you want.
- Click Next.
- Check all properties you want to be in the schedule or uncheck all properties you want to leave out.
- Click Finish.
- Right-click on the schedule again and choose Create/Update Table.
- Repeat this action but choose Create/Update CSV.
- The table and CSV file are now updated. You can update and open your sheet with the schedule again and see the changes.