Creating slabs
Commands
DMEXTRUDE, POLYSOLID
Note:
The DMEXTRUDE command allows to extrude a closed 2D entity such as polylines, circles, ellipses and extrude a detected boundary, enclosed by walls and/or 2D entities.
The POLYSOLID command allows to create pitched roofs.
Creating floor slabs between walls
Make sure that:
- The Enable Boundary Detection option of the SELECTIONMODES system variable is ON.
- The bottom faces of the surrounding walls are in the XY-plane of the current
coordinate system.
If necessary, move the origin of the coordinate system.
- Dynamic dimensions are ON.
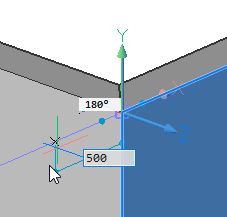
- Move the cursor inside the surrounding walls.
- When the boundary highlights, choose Extrude in the
Model command group in the Quad.
The slab is extruded dynamically.
- Do one of the following:
- Type the thickness of the slab in the dynamic dimension field.
- Pick a point.
Creating a pitched roof slab
Make sure that:
- Dynamic UCS is ON.
- Dynamic dimensions (DYN) is ON; it is recommended to have the Tracking dynamic dimensions option of the DYNMODE system variable set.
- Entity Snap Tracking (STRACK) is ON.
- Endpoint entity snap is ON.
- Launch the POLYSOLID command.
You are prompted: Start point or [Height/Width/Justification/Entity/Separate solids/Dynamic] <Entity>:
- Move the cursor over the outside face of a wall which is perpendicular to the roof slab you want to create.
- When the face highlights, hit the Shift key to lock the dynamic UCS.
- Do one of the following:
To create the roof at the top edge of the wall, snap to the exterior top corner of the wall.
To create a roof overhang (eave):- Move the cursor over the exterior top corner of the wall to require a snap tracking point.
- When a small red cross indicates the tracking point is acquired, move the cursor to the outside and type the overhang distance in the dynamic entry field.
- Hit the TAB key to activate the Angle field, then type the pitch angle and hit
the TAB key again to jump to the Distance field.
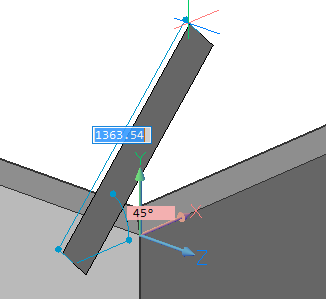
- Specify the height of the roof slab, then press Enter twice: the first Enter
creates the footprint of the roof slab, the second Enter interrupts the creation
of a second solid.
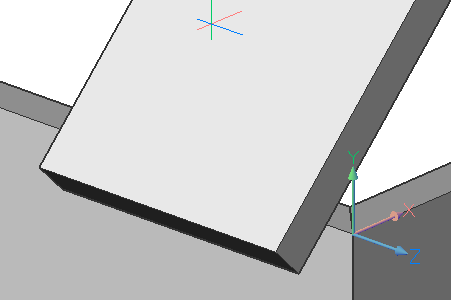
The roof slab is extruded dynamically.
- Specify a point to define the length of the extrusion.
- Repeat the previous steps to create more roof slabs.
- Use CONNECTWITHNEAREST to connect the walls to the roof slabs.