Bill of Materials Manager
Overview
Use the BMBOMPANELOPEN, BMBOMPANELCLOSE, and BMBOM commands.
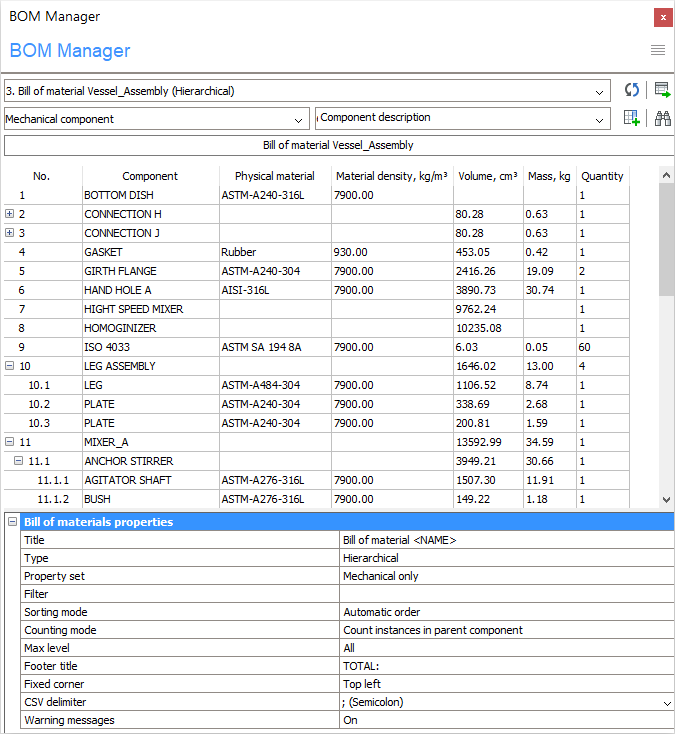
The Bill of Materials Manager allows you to browse, create and edit bills of materials (BOMs) in the current drawing. Use the manager to interactively configure (new and existing) bills of materials. You can save the configuration of a bill of materials as a template file and reuse it later in other drawings. You can also add a bill of materials that is not linked to a table in the drawing.
- Browse existing bills of materials in the drawing.
- Create a new bill of materials using either a standard type (such as top-level, bottom-level, hierarchical) or an existing BOM template.
- Edit bills of materials:
- Add or remove columns (includes formula columns).
- Move selected columns to new positions.
- Rename the columns.
- Configure how the BOM table is sorted.
- Configure the footer value for each individual column.
- Configure the units and how they are displayed for each column.
- Configure the width of each column with column properties.
- Configure the visibility of each individual column.
- Filter the components with a filter expression.
- Change the title of both the title row and the footer row.
- Search for components in the table.
- Highlight and select component instances.
- Save the BOM configuration as a template file.
- Load a BOM table configuration from a template file.
- Place the BOM table in a drawing.
- Delete BOM tables.
A Mechanical or Ultimate license is required to modify or create bills of materials. However, the manager is available with a Pro license.
Open the Bill of Materials Manager
- Place the cursor on a toolbar, right-click, choose Panels, and choose BOM Manager from the context menu.
- Launch the BMBOMPANELOPEN command.
Tools
Most of the configuration operations in the manager are available in the main menu. A context menu is available for selected columns or rows. You can also change the properties of the selected columns and the BOM itself in the properties section of the manager. To work with a particular column, select it in the BOM grid. Multiple columns can be selected simultaneously.
Main menu
Click
Menu ( ) at the top right
corner of the BOM Manager panel.
) at the top right
corner of the BOM Manager panel.
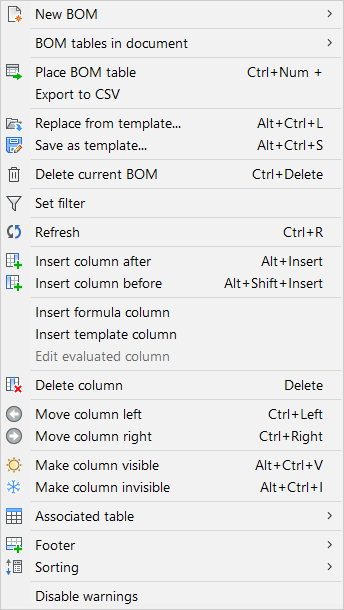
| Icon | Tool | Description |
|---|---|---|
 |
New BOM |
Open a submenu: 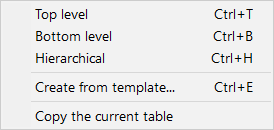
|
| BOM tables in the document |
Open a submenu: 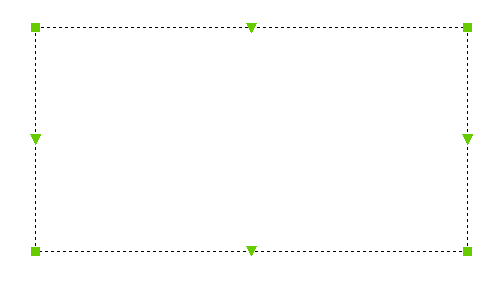
|
|
 |
Place/update BOM table | Start the interactive placement of a table in the drawing. If
the table is already placed in the drawing, it updates the
table. Note: All editing operations
update the associated table in the drawing
automatically. |
| Export to CSV |
Save the content of the current table to a CSV file. Open a dialog box to select the location for the CSV
file:
Note: You can adjust the
separator for CSV values using the table
properties.
|
|
 |
Replace from template |
Replace the current BOM table configuration with the selected template. Open a dialog box to select the template file. |
 |
Save as template |
Save the configuration of the current BOM table as a template. Open a dialog box to select the location for the new template file. |
 |
Delete current BOM | Delete the current BOM table from the document. |
 |
Set filter |
Opens a dialog to configure the main filter: 
|
 |
Refresh | Update the current BOM, and list all BOM tables in the drawing. |
 |
Insert column after |
If a column is selected: insert a column from the Column selector after the selected column in the table. If no column is selected: add a new column after the last column in the table. |
 |
Insert column before |
If a column is selected: insert a column from the Column selector before the selected column in the table. If no column is selected: add a new column as the first column in the table. |
| Insert formula column |
Open a dialog box to configure a formula column: 
Click OK to add a new formula column after the selected one. If no column is selected, a new formula column is added after the last column in the table. |
|
| Insert template column |
Open a dialog box to configure a template column: 
Click OK to add a new template column after the selected one. If no column is selected, a new template column is added after the last column in the table. |
|
| Edit evaluated column | Open a dialog to edit the selected formula or template column. | |
 |
Delete column |
Removes the selected column from the table. You can also select a column in the BOM grid and hit the Delete key to remove a column. |
 |
Move column left | Move the selected column(s) one column to the left. |
 |
Move column right | Move the selected column(s) one column to the right. |
 |
Make column visible | Show the selected column in the associated table in the drawing. |
 |
Make column invisible | Remove the selected column from the associated table. Invisible columns remain visible in the BOM manager but are marked with a diagonal hatch pattern in the background. |
 |
Associated table |
Open a submenu: 
|
 |
Footer |
Open a submenu: 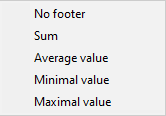
For each of the selected columns:
For more details, see section Footer in Bill of Materials. |
 |
Sorting |
Open a submenu: 
For more details, see section Sorting in Bill of Materials. |
| Disable/Enable warnings | Control the display of warning messages during the creation or update of BOM tables. |
Toolbars
| Icon | Tool | Description |
|---|---|---|
|
Main menu | Open the main menu. |
|
BOM Selector | Select the current BOM table. The selection is stored in the drawing. When the drawing is closed and reopened, the selected BOM is restored in the manager. When selected, the table is updated to the current state of the drawing. |
|
Refresh | Update both the current BOM and the list of all BOM tables in the drawing. |
|
Place/update table | Start the interactive placement of a table in a
drawing. Update the table if it already exists. Note: All edit operations
automatically update the associated table in the
drawing.
|
|
Category selector | Select a properties category. |
|
Column selector | Select the column to be added to the current BOM. You can also use this to enter a formula for a formula field. To add a formula, type an expression starting with "=", such as "=<Mass>*<Quantity>". The formula may refer to other columns. Use their display names enclosed in <>. |
|
Insert column after | If a column is selected: insert the column from the
Column selector after the selected
column in the table. If no columns are selected: add the new column after the last column in the table. |
 |
Find | Toggle the search field on and off. You can also use Ctrl+F. |
 |
Search field | Enter a search string; wild cards are supported. |
 |
Find previous | Select the previous match in the BOM table. You can also use Ctrl+F3. |
 |
Find next | Select the next match in the BOM table. You can also use F3. |
 |
Select all found | Select all matches in the BOM table. |
Column context menu
Right-click a column label to open the context menu. The column is added to the current selection.
| Icon | Tool | Description |
|---|---|---|
| Add template column from selected | Open a dialog to configure a new template column. The selected columns will be automatically added to the template expression. | |
|
Delete column | Remove the selected column(s) from the table. You can also select a column in the BOM grid and press the Delete key. |
|
Footer | Open a submenu for the selected column(s):
|
|
Sorting | Open a submenu:
|
| Aggregate function | Open a submenu for the selected column(s):
|
|
| Column role | Open a submenu for the selected column:
|
|
 |
Format |
Set the specified format for selected column(s). Open a dialog box:
|
|
Set column filter |
Open a dialog box to configure the column filter:
|
|
Make column visible | Display the selected columns in the associated table in the drawing. |
|
Make column invisible | Remove the selected column from the associated table. Invisible columns remain visible in the BOM manager but are marked with a diagonal hatch pattern in the background. |
| Fit column(s) | Fit the width of the selected column(s) to their
content. The column width automatically fits the content unless the width has been changed manually. |
|
| Fit all columns | Fit the width of all columns to their content. The column width automatically fits the content unless the width has been changed manually. |
Row context menu
Right-click on any cell to open the context menu.

| Icon | Tool | Description |
|---|---|---|
 |
Zoom to | Zoom to the select part(s) in the model. |
|
Select | Select the part(s). Replace an existing selection. |
 |
Add to Selection | Add part(s) to the selection. |
 |
Remove from Selection | Remove the parts from the selection. |
| Remove highlighting | Remove highlighting. | |
| Clear selection | Clear a selection. | |
| Collapse | Collapse the subassembly group in the BOM grid. | |
| Expand | Expand the subassembly group in the BOM grid. | |
| Expand this level | Expand all subassembly groups at the same level of the assembly tree as the current one. | |
| Collapse this level | Collapse all subassembly groups at the same level of the assembly tree as the current one. | |
| Expand all | Expand all subassembly groups in the current BOM. | |
| Collapse all | Collapse all subassembly groups in the current BOM. | |
| Limit by this level | Set the current level as the maximal level for hierarchical BOM tables. | |
| Show all levels | Remove the maximal level limit for hierarchical BOM tables. |
BOM Title
Displays the title of the current BOM, as displayed in the drawing. Left-click on this control to edit the drawing. In this mode, the BOM title control shows the title template instead. The title template is a string that may contain a <NAME> placeholder, which will be replaced by the assembly name.
Grid
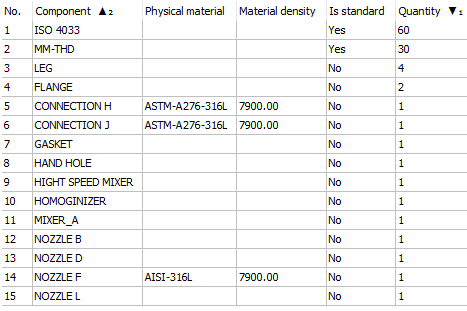
The grid displays the content of the selected BOM table. Each row is linked with its corresponding instances. When a row is selected, the corresponding parts are highlighted in the drawing. Use the context menu, to select corresponding parts, add or remove them from the current selection, and to zoom to those parts. Double-click on any cell in the row to zoom to the corresponding parts.
Moving a column
To move a column in the BOM table drag and drop it to its new position.
Visible and invisible columns
You can make any column in the BOM table invisible, so it does not show in the resulting table. Invisible columns remain visible in the BOM grid with a hatched background. You can change the visibility of columns in the main menu, the column context menu, or by editing the Visible property of a column in the Properties grid.
Width adjustmentYou can adjust the width of any column in the BOM grid, which is independent from the width in the associated table. If the width of the column is less than needed to display the text of the cell, the height of the corresponding row increases to fit the text.
When the column width is adjusted manually, the width remains the same regardless of the content of the table. The width is also stored in the BOM configuration. All adjusted column widths remain the same even when the drawing is closed and reopened.
- Select the column(s), right-click the context menu and select Fit column(s).
- Double-click the separator in the column header.
Sorting a BOM
Use the grid to control how the table of content should be sorted. Double-click a column label to change the order between ascending, descending, and unordered. If a column is used to sort the table, its label has a symbol added (▲ for ascending and ▼ for descending). Double-click the label to revert the sorting order.You can use multiple columns to sort. The sort symbols of these columns have a subscript to denote the sort order. For example, if you sort by quantity in descending order and then by component name in ascending order, the Quantity column has a ▼₁ symbol and the Component column has a ▲₂ symbol.
Expand/collapse groups
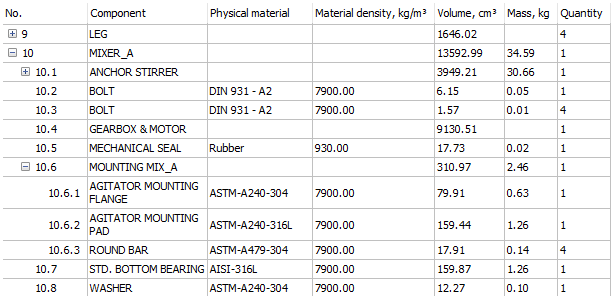
In hierarchical BOMs, each subassembly forms a group that can be collapsed or expanded in the BOM grid.
- Click on the node icon in the first column of the BOM grid.
- Right-click on the row, then select Collapse or Expand from the context menu.
You can also collapse or expand all groups or all groups corresponding to the same assembly level using the context menu.
Properties

The properties grid is located at the bottom of the manager's panel. To adjust its size, use the splitter control, located between the grid and the properties grid.
The properties grid contains the properties of the current table; title, type, filter, sorting mode and footer title. If any columns are selected, the grid will also display their common properties. You can change any common property for all the selected columns at once. Column properties change the title, visibility, and width of the column.
For numerical values, you can set the footer type, unit placement, and the units mode (if the column has units that can be changed).
The unit placement defines where the units are displayed: in the column title, in the same cell as the value itself, or in its own column.
The units mode defines how the displayed unit should be obtained; the best unit for all values, the best unit to display a particular value in the cell, or a specified unit. You can choose the Units mode for distance, area, volume, or mass properties.
Filter
- Use the Filter property in the Bill of materials properties section of the Property grid.
- Use the Set filter command from the Main menu.
In both cases, the Filter Configurator dialog box is displayed:
Each row in this dialog box represents an elementary condition. It is possible also to add groups to combine several elementary conditions and/or groups. Groups allow to create complex filters.
Adding a new elementary condition
- If applicable, choose the required category to limit the list of properties to that particular category.
- Select the required property from the list of properties. When selected, a condition for the property is added automatically.
- If applicable, the required condition type:
- Not equal to
- Less than
- Greater than
- Not less than
- Not greater than
- Set the target value. For text values, you can select the target value from the drop-down list of all possible values. For numerical values, you can specify the unit of the target value. The value will be automatically converted to the document unit.
Removing one or more conditions
- Select the conditions to remove. You can use the Ctrl key to select several conditions, and Shift key to select a range of conditions.
- Click the Delete tool (
 ), or
right-click the row you want to delete and select Remove
condition in the context menu.
), or
right-click the row you want to delete and select Remove
condition in the context menu.
Adding a new group of conditions
- Click the Add tool (
 ).
). - Select Add "All of" group to add a new "All of" group, or select Add "Any of" group to add a new "Any of" group.
- Add the necessary conditions.
Grouping selected conditions
- Select the conditions to remove. You may use the Ctrl key to select several conditions, and Shift key to select a range of conditions.
- Right-click the row you want to group.
- Select Form "All of" group from selected to form a new "All of" group, or select Form "Any of" group from selected to form a new "Any of" group.
To apply the filter, click OK.
Column filters
Column filters allow you to set the conditions on which rows to include in the table.
Each column filter sets a condition that column values should meet in order to be
included. For example, you may set a column filter to include only parts with
quantities larger than a certain number, or parts whose names contain Nozzle.
A column can have no more than one filter. However, it is possible to simultaneously
set filters for as many columns as you need. Columns with active filters are marked
with a filter icon ( ) in their
title.
) in their
title.
To add a column filter, right-click the column title and select Set column filter in the context menu.
A Column filter dialog box is displayed.
Select the required filter type. Next, you will need to set the target value(s) for the filter, depending on the filter type and the column content.
For columns with numerical content, you can set the unit for the target value. The target value will be automatically converted to the document unit internally.
For text filters, you can choose between ignore case and match case options. In and Not in filters show you the list of all possible values for this column (with respect to already applied filters). Check the values that you want to be included or excluded correspondingly. You can also check all values, uncheck all values, or invert the current selection by using the corresponding buttons on toolbars or commands from the context menu.
To apply the column filter, click OK.
To remove a column filter, right-click on the column title and select Remove column filter from the context menu.
For more details, see section Filtering in Bill of Materials.
Sort
BOM tables support several sort modes (for more details, see section Sorting in Bill of Materials).
To switch between these modes, use the Sorting mode property in the Bill of materials properties section of the Properties grid. Use the Sorting mode drop-down menu or double-click the column labels in the Grid to toggle between ascending, descending or natural order for the respective column.
Column units
It is possible to change the Unit placement and Units mode for most numerical properties with units. Select the required columns in the Grid and use the Column properties section of the Properties grid to change the Unit placement and the Units mode.
For more details, see section Column units in Bill of Materials.
See also section Changing the units and unit placement modes for a column.
Evaluated columns
A BOM supports evaluated columns. There are 2 types of evaluated columns: formula and template columns. For more details about formula fields, such as expression syntax, see section Evaluated columns in Bill of Materials.
See also section Adding an evaluated column.
Formula columns
- Select the Evaluated column category using the Category selector.
- Select Formula column in the Column selector.
- Use Insert column after or Insert column before tools.
As an alternative, you can use the Insert formula column option from the Main menu.
In both cases, an Expression configurator dialog box is displayed:
This dialog box allows you to configure the title, unit and expression for the formula column. It also displays a preview of the formula results. The expression field supports autocompletion.
To add a reference to a column or a property to the expression at the cursor
position, select the required property from the list of properties. You can also
click the Add column reference tool ( ) and select the
property from the menu, or click the Add function tool
(
) and select the
property from the menu, or click the Add function tool
( ) to select the
required function.
) to select the
required function.
To add a formula column to the BOM table, click OK.
Template columns
- Select <Evaluated column> category using the Category selector.
- Select <Template column> in the Column selector.
- Use Insert column after or Insert column before tools.
As an alternative, you can use the Insert template column option from the Main menu.
In both cases, a Template configurator dialog box is displayed.
This dialog box allows you to configure title, expression and, if necessary, unit for your template column. It also displays a preview of the results. The expression field supports autocompletion.
Template columns may contain more than one template subexpression. In that case, they are evaluated from first to last, and the first subexpression yielding in non-empty result is used. The Template configurator allows you to add, delete and switch between template subexpressions using the toolbar. It also allows to change the order of template subexpressions.
To add a subexpression, click  .
.
 .
. To change the current subexpression, select the number of the required subexpression from the drop-down list.
Use  and
and  to change the order
of the subexpressions.
to change the order
of the subexpressions.
The currently selected subexpression can be configured using the Template section. Each column in this section represents an item of the template expression, which you can change.
- Column reference: represents a reference to a BOM column or a property. To add a column reference, select the required column from the list of properties. It will be automatically added after the last selected column, or, if no column is selected, after the last column. If necessary, a Delimiter will be added in front of the Column reference automatically.
- Delimiter: represents a separator between 2 items.
The delimiter text will appear in the final result only if the text on both
sides of it is not empty. For example, if you have PartNumber and Length
column references with the "X" delimiter between them, the "X" will be added
to the final text only if both PartNumber and Length are not empty. In most
cases, delimiters are added automatically. However, you can add delimiters
by using the button and
selecting Add delimiter from the drop-down list.
Alternatively, you can add a delimiter from the context menu.
- Text: represents a custom text. You can add custom
text by clicking and
selecting Add text from the drop-down list.
Alternatively, you can add a custom text from the context menu.
- Evaluated text: represents an item that must be added
to the final expression as is. Evaluated text may contain functions or other
special symbols that will modify the result. You can add an evaluated text
by using the button and
selecting Add expression from the drop-down list.
Alternatively, you can add an evaluated text from the context menu.
At any moment, you can change the content of any item in the template. You can also
delete items by selecting them and using the button, or by
choosing Delete column in the context menu. To move an item,
select a column in the template and then drag and drop it at the desired position.
Any modifications of the template will be reflected in the expression field.
Similarly, any changes in the expression field will be reflected in the template
area.
To add a template column to the BOM table, click OK.
Footer row
A BOM table can include a footer row. To add a footer row, specify the footer type for one or more columns. By default, the title of the footer row is TOTAL:. Change the footer title with the Footer title property in the Bill of materials property section of the Properties grid.
For more information about a footer row in a BOM, see section Footer in Bill of Materials.
See also section Add a footer for the column.
Aggregated columns
In top-level and bottom-level BOM tables, almost any column can be assigned with an aggregate function. Aggregate functions group values of several rows in a BOM (that differ only in those values) into a single value. For example, aggregate functions can be used to compute the total length of pipes with respect to their size and thickness, or to concatenate all sizes of bolts and nuts used in the assembly in a single cell.
For more details, see section Columns in Bill of Materials.
- Right-click on the column title and select the required aggregate function from the Aggregate function submenu.
- Select the column and change the aggregate function in the corresponding column property.
Aggregated columns are marked with the ∑ symbol in their title.
Templates
You can save BOM configurations as templates. Use the BOM manager to create a new table from a template and to replace the current table configuration with one from a template. You can save the configuration as a template at any moment. You can change a loaded template configuration with the regular tools and save it as another template.
For more information about BOM templates, see section Templates in Bill of Materials.
Searching
The BOM manager has a search field that allows you to search for a particular value
in the table. You can also use wild cards in the search field. By default, BricsCAD
searches the entire table. To limit the search area, select the required columns. If
the value is found, the cursor moves to that cell. If no columns are selected, the
row is selected. The Grid automatically scrolls to make the
cell visible. To find another value, use the  or
or  buttons. You can
also use F3 or Ctrl+F3. To select all
found results, use the button.
buttons. You can
also use F3 or Ctrl+F3. To select all
found results, use the button.
By default, the text in the search field is searched for. However, you can also use wild cards.
The following special symbols are supported:
| Name | Character | Description |
|---|---|---|
| Back quote | ` | Escapes the next character (takes it literally). |
| Comma | , | Separates patterns. |
| Asterisk | * | Matches any character sequence, including a null sequence, anywhere. |
| Question mark | ? | Matches a single character. |
| Period | . | Matches a single non-alphanumeric character. |
| At sign | @ | Matches a single alphabetic character. |
| Pound sign | # | Matches a single numeric character. |
| Tilde | ~ | If the first character in a pattern matches anything but the pattern. |
| Brackets | [...] | Matches a single enclosed character. |
| Tilde brackets | [~...] | Matches a single non-enclosed character. |
| Hyphen | - | In brackets, matches a single character in the specified range. |
To open the search field, use the Search tool on the toolbar or use Ctrl+F.
Associated table
Each BOM table in the manager can have an associated table in the document, which updates when the BOM configuration is changed. A BOM table can have one associated table only. However, you can create BOM tables that do not have an associated table in the document.
To create an associated table, use Place/Update table. If the BOM table was created with BMBOM, the associated table is created automatically.
You can locate the associated table in the document with or . If necessary, the active layout switches to the associated table layout.
You can delete the associated table with . As an alternative, you can detach the associated table from the BOM table with . After it is detached, the associated table loses its link to the BOM table and will not update with the BOM.
Updating the BOM
From BricsCAD V20.2, the BOM manager automatically updates the table content in the panel, when the assembly is modified or updated. For large assemblies, this may be inconvenient. The BOM manager automatically updates the table when active.
To avoid the automatic update, close the BOM manager to make the BOM Manager panel inactive.
Use Refresh to manually refresh the BOM manager content.
Adding a new bill of materials
- Use the New BOM submenu of the Main
menu.
Figure 31. New BOM submenu
- Select the BOM type or select From template to choose the template file for a BOM.
Selecting the current BOM
Use the BOM selector to select an existing bill of materials.
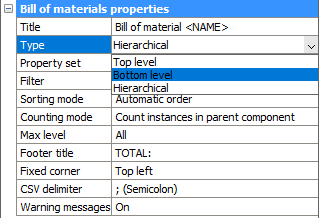
Changing the type of the current BOM
Change the Type property in the Bill of materials properties section of the Properties grid.
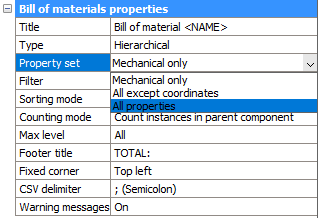
Changing the property set of the current BOM
Change the Property set property in the Bill of materials properties section of the Properties grid.
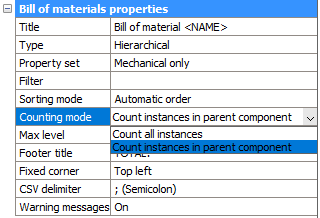
Changing the counting mode of a hierarchical BOM
Change the Counting mode property in the Bill of materials properties section of the Properties grid.
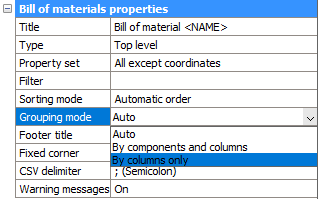
Changing the grouping mode of top- or bottom-level BOM
Change the Grouping mode property in the Bill of materials properties section of the Properties grid.
Setting a custom filter for the current BOM
-
Select the Set filter option from the Main menu.
A Filter Configurator dialog box is displayed.
-
Configure the filter using the dialog tool.
See section Filter for details.
-
Click OK to apply the filter.
Figure 36. Filter Configurator
Adding new columns to the current BOM
-
If applicable, use the Category selector to select the category of the properties you want to add.
Figure 37. All columns 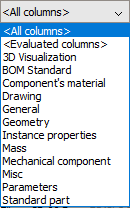
-
Select the property to add from the list of the available columns. This list contains all columns from the selected category which are not yet added to the BOM. If you start to type the name of the field, BricsCAD automatically suggests names to you. Click to select it from the list.
Figure 38. Component description 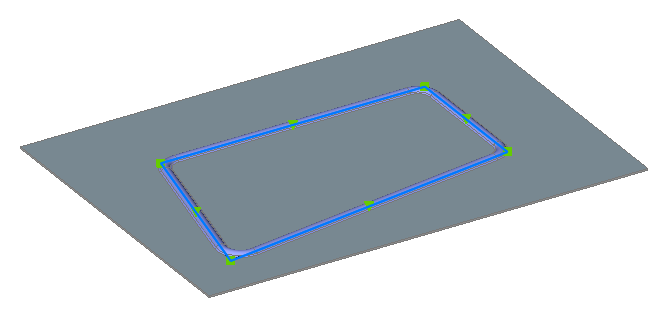
- If applicable, select the column in the BOM you want to place the new column next to.
-
Click Insert the column after (
) to
place the new column after the selected one, or Insert the
column before () to
place the new column before the selected one.If no column is selected, the new column is placed as the last or the first position respectively.
Adding an evaluated column
-
Select the Evaluated columns category using the Category selector.
-
Select Formula column to create a formula column, or select Template column to create a template column.
-
Click Insert the column after (
) to
place the new column after the selected one, or Insert the
column before () to
place the new column before the selected one.If no column is selected, the new column is placed as the last or the first position respectively.
A dialog box to configure the evaluated column is displayed.
-
Change the Title of the column.
-
If applicable, change the Unit.
-
Configure the expression using the dialog tools.
-
Click OK to add the column to the BOM table.
Adding a template column from selected columns
-
Select the columns to be combined in a template column. Use the Ctrl key to select multiple columns or the Shift key to select a range of columns.
-
Right-click on the title of one of the selected columns.
-
Select Add template column from selected from the context menu.
A dialog box to configure the evaluated column is displayed.
-
Change the Title of the column.
-
If applicable, change the Unit.
-
Configure the expression using the dialog tools.
-
Click OK to add the column to the BOM table.
-
If applicable, remove or hide columns that are no longer necessary.
Changing an evaluated column
-
Right-click on the column title in the BOM grid.
-
Select Edit column expression from the context menu.
A dialog box to configure the evaluated column is displayed.
-
If applicable, modify the column title, unit and expression.
-
Click OK to apply the changes.
Removing a column from the current BOM
-
Select the column in the grid.
- Click the Remove the column tool (), or press
Delete.
Changing the BOM title
Use BOM Title to edit the title, or use the Title property in the Bill of materials properties section of the Properties grid.
You can use the <NAME> placeholder to refer to the assembly name.
Changing the footer row title
Use the Footer title property in the Bill of materials properties section of the Properties grid.
Adding a prefix or suffix to numbers
-
Select the Number column.
-
Select Number prefix property in the Column properties section.
Figure 39. Column properties 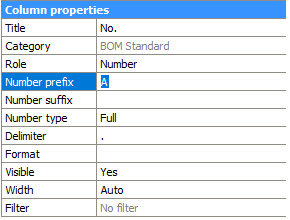
-
Enter the new prefix string if necessary.
-
Select Number suffix property in the Column properties section.
-
Enter the new suffix string if necessary.
Changing the delimiter between numbers in a hierarchical BOM
-
Select the Number column.
-
Select Delimiter property in the Column properties section.
Figure 40. Column properties 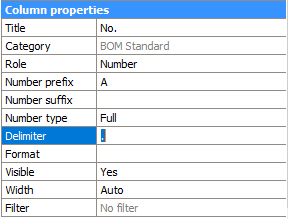
-
Enter the new delimiter string.
Changing the number type in hierarchical BOM
-
Select the Number column.
-
Select Number type property in the Column properties section.
Figure 41. Column properties 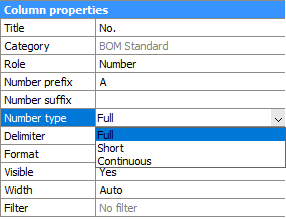
-
Select the required number type.
Change the column title
-
Select the column in the BOM grid.
-
Select Title property in the Column properties section.
Figure 42. Column properties 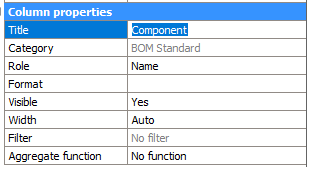
-
Change the Title property value to the new title of the column.
Change the column format
-
Select the column(s).
-
Right-click on the title of a selected column.
-
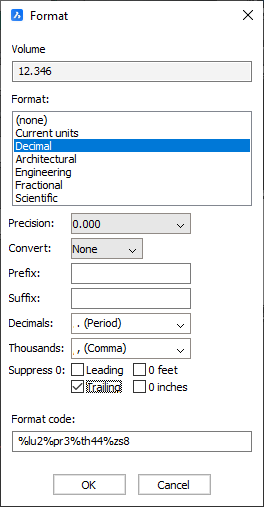
Select Format in the context menu.
The Format dialog box displays.
Figure 43. Format
-
Define the desired format.
-
Click OK to apply the changes.
Changing the units and unit placement modes for a column
-
Select the column(s).
-
If applicable, change the Unit placement property in the Column properties section.
-
If applicable, change the Units mode property in the Column properties section.
Figure 44. Column properties
- If applicable, change the Title format.
- Use <Title> to add the column title.
- Use <Unit> to add the column unit.
- Use \n to add a line break.
Adding a footer to a column
-
Select the column(s).
-
Use the Footer submenu of the Main menu to select the type of footer value, or right-click on the column label and then select Footer submenu.
The following types are available:
- No footer (the column will be removed from the footer. If there is no column with another footer type, the footer row will be removed completely)
- Sum
- Average value
- Minimal value
- Maximal value
As an alternative:
-
Select the column(s).
-
In the Properties grid, select the Footer type property and choose the footer type.
Figure 45. Column properties 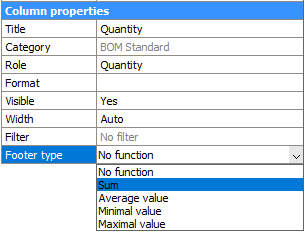
).Saving the current configuration as a template
-
Choose Save as template (
 ) in the
main menu ().
) in the
main menu ().The dialog box to select the name and location for a template file displays.
Figure 46. Select file to save BOM table template
-
Specify the name and location of the template file.
-
Click Save.
Exporting the current table to CSV
-
If applicable, adjust the CSV delimiter property of the table.
Figure 47. CSV delimiter 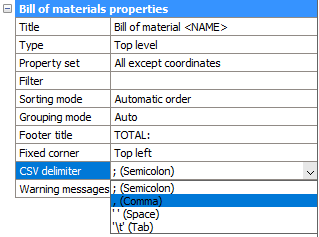
-
Choose Export to CSV in the main menu (
).The dialog box to select the name and location for a CSV file displays.
Figure 48. Select file to export BOM table
-
Specify the name and location of the CSV file.
-
Click Save.