TABLEMOD command
Formats the properties of table cells and inserts blocks.

Method
Select a table cell to edit and the Table toolbar will be displayed.

Options within the command
- Insert row above
- Inserts an empty row above the selected cell.
- Insert row below
- Inserts an empty row below the selected cell.
- Delete row
- Deletes the row(s) of the selected cell(s) without warning.
- Insert column left
- Inserts an empty column at the left of the selected cell.
- Insert column right
- Inserts an empty column at the right of the selected cell.
- Delete column
-
Deletes the column(s) of the selected cell(s) without warning.
Note: Use the U command to reverse the change.
- Merge cells (1)
-
Merges the selected cells. Click the icon and then choose an option.
- Merge All merges all selected cells into a single cell.
- Merge by Row merges the selected cells into rows, each with one cell.
- Merge by Column merges the selected cells into columns, each with one cell.
Note: When cells are merged, all their content is erased, except for that of the first cell.
- Unmerge cells (2)
-
Splits previously merged cells by rows and columns. BricsCAD uses the row numbers (1, 2, 3, etc) and column letters numbers (A, B, C, etc) to know how to split the merged cells into the original set.
Note: When cells are unmerged, the content erased by the Merge Cells option is not returned.
- Border style (3)
- Sets the border style of the selection. Displays the Cell Border Properties dialog box.
- Text alignment (4)
-
Sets the text alignment of text in the selected cells. Click the icon and then choose an option.
Note: The content of each selected cell is aligned inside the cell. For instance, select four cells, and then choose Bottom Right, the content in each of the four cells is justified bottom-right.
- Lock/unlock (5)
-
Locks and unlocks the content and/or the format of selected cells. Click the icon and then choose and option:
- Unlocked - the selected cells are unlocked, which means that they can be edited.
- Locked Content - the content of the selected cells is locked, but the format of the cells can still be modified.
- Locked Format - the format of the selected cells is locked, but the content of the cells can still be edited.
- Locked Format and Content - the content and the format of the selected cells are locked.
Note: It is common to lock header cells.
- Cell format (6)
-
Sets the cell format of the selection.
Note: This option is not implemented yet.
- Insert block reference (7)
-
Inserts a block or a drawing in the selected cell. Click the icon to display the Insert Block in Cell dialog box.
Note: Placing a large drawing in a small cell can lead to program instability.Note: You can have both text and blocks in a single cell.Note: Use the Manage Cell Content dialog box to arrange the text and blocks.
- Manage cell content (8)
- Manages blocks and drawings in cells; click the icon to display the Manage Cell Content dialog box.
- Cell style
-
Sets the sub-style of the selected cells. Click on the drop list, and then choose a sub-style name:
- Title - the title style is usually applied to the topmost row of the table
- Header - the Header style is usually applied to the first row of a column
- Data - the Data style is usually applied to all other rows in the table
Note: The properties of the Header, Border, and Cell sub-styles are defined by the table style; see the TABLESTYLE command.
- Cell background
- Sets the background color of the selected cell(s). Click on the drop list and choose a color.
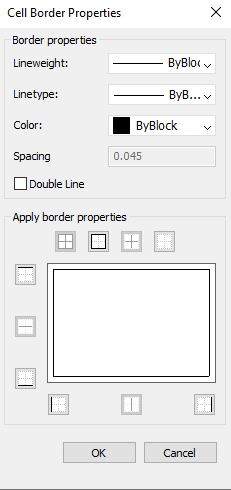
- Cell border properties dialog box
- The Cell Border Properties dialog box controls the border properties of a table cell.
- Border properties
- Determines the look of the borders that surround each cell. More information about the Lineweight, Linetype and Color properties can be found in Properties panel.
- Apply border properties
-
Applies properties to only certain borders.
Note: So that the Inside borders option to work, you have to select more than one cell.Note: Although the preview window shows only the double line effect, the other properties are applied to the specified cell border line.
- OK
- Exists the dialog box, applies the properties and returns to the Table toolbar.
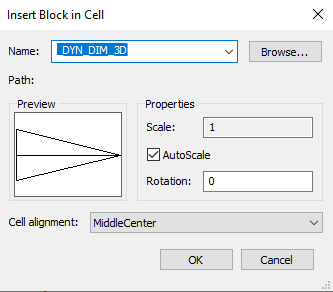
- Insert block in cell dialog box
- The Insert Block in Cell dialog box manages the insertion of a block in a table cell.
- Name
-
Specifies the name of the block or drawing to insert or click on Browse to display the Open drawing file dialog box and search for a block to insert.
- Properties
- Determines the size of the block in the cell.
- Scale
-
Specifies the size of the block:
- Numbers larger than 1.0 make the block larger
- 1 - inserts the block at its actual size
- Numbers smaller than 1.0 make the block smaller
- Negative numbers flip the block upside down
Note: This option is unavailable when AutoScale is turned on.
- AutoScale
-
Sizes the block to fit the cell:
- On - the block is resized to fit the cell
- Off - the cell is resized to fit the block
- Rotation
-
Rotate the block about its center point (and not its insertion point); enter an angle:
- Positive numbers rotate the block counter clockwise
- 0 - does not rotate the block
- Negative numbers rotate the block clockwise
- Cell Alignment
- Aligns the block in the cell.
- OK
- Exists the dialog box, inserts the block and returns to the Table toolbar.
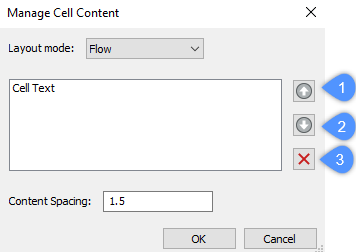
- Manage cell content dialog box
- The Manage cell Content dialog box manages the content of a table cell.
- Layout mode
-
When a cell contains more than one element, this option determines how they relate to each other. Click the drop list and then choose an option:
- Flow - arranges the elements to fit the cell
- Stacked horizontal - forces the elements to be arranged horizontally
- Stacked vertical - forces the elements to be arranged vertically
- Move Up (1)
- Moves the selected element up the list, so that it appears above other elements in the cell.
- Move Down (2)
- Moves the selected element down the list, so that it's below other elements in the cell.
- Delete (3)
- Deletes the selected element from the cell.
- Content Spacing
- Specifies the distance between elements in the cell. Enter a number in drawing units.
- OK
- Exits the dialog box, changes the arrangement of the cell's contents, and then returns to the Table toolbar.
Context Menu Options
When the TABLEMOD command is running, right-click a cell to see its context menu.
- Clear Cell Overrides
- Resets the properties of cells to the Cell sub-style settings defined in the table style.
- Clear Table Overrides
- Resets the table properties to those defined in the table style.
- Insert Block Reference
- Inserts blocks and drawings.
- Manage cell Content
- Manages the text and blocks in cells.
- Copy
- Copies the content of the cell(s) to the Clipboard for pasting into other cell(s).
- Cut
- Cuts the content of the cell(s) to the Clipboard for pasting into other cell(s).
- Paste
- Pastes cell content from the Clipboard into cell(s), with these
caveats:
- All content in the cell is replaced by the pasted item.
- When more than one cell is selected for pasting, content is pasted only in the first cell.
- Non-cell data is not pasted, such as entities from the drawing or text from another application.
- Insert DataLink
-
Adds data from an external file to the end of the table. Acceptable file formats are:
- CVS: ASCII files in which fields are separated by a delimiter character, such as comma or tab.
- XLS: older Excel spreadsheet files.
- XLSX: new Excel spreadsheet files.
Note: For more details, see DATALINK command.
- Remove DataLink
- Removes the link to the table, but the data remains in the table.
- Update DataLink
-
Updates the data in the table from the external file.
Note: Available only when the table has a datalink.
- Size rows equally
- Sizes the selected rows to match the size of the tallest cell in the selection set.
- Size columns equally
- Sizes the selected columns to match the size of the widest cell in the selection set.
- Size all rows equally
- Sizes all rows in the table to match the tallest row.
- Size all columns equally
- Sizes all column in the table to match the widest column.


